
6 Highly Productive Ways To AB Test Content Marketing
Here are six different ways to AB test content elements and the things you should be measuring.
There is a critical part of your sales funnel that probably isn’t optimized.
When you think about CRO, you think about optimizing your online funnel – your emails, landing pages, checkout process, etc. – in order to acquire more customers.
What you don’t often think about is AB testing your content.
In fact, when it comes to content driven marketing, we rarely see the same commitment to testing, tracking, and optimizing that occurs elsewhere in marketing. Considering that content is found at the top of your sales funnel, the wrong content could be hurting your conversion rates.
Content can be tested in the same way anything else can be tested, and some elements definitely deserve a more CRO-esque approach.
Goals for AB Testing Content
One of the reasons that content is less-frequently tested, is that the goals are often unclear.
Content is great for SEO.
Content is great for educating clients.
Content is great for establishing your brand’s thought leadership.
Content is great for sharing on social media.
Content is also great for getting prospects into the sales funnel. This is typically done by collecting an email address to begin the conversation.
Here are the 6 different elements you should definitely consider testing. You can run any of these tests using these recommended AB testing tools, but I’ve also included some simple WordPress plugins as a viable alternative if you want to try this on a small budget.
1. Split Test Your Headlines
Your headline is arguably the most important piece of your content. It’s the thing that determines whether people click through from your email or social media post.
On average, 80% of your readers never make it past the headline.
Yup, only 2 in every 10 of your readers actually read past the headline. Even fewer make it all the way through the article.
Funny enough, it’s also one of the simplest things to test. It’s so easy.
You already know how to run an AB test. Applying that practice to your headlines is a simple 4-step process.
1. Brainstorm headlines to test.
Stephanie Flaxman of CopyBlogger says you should ask yourself three questions to make your headline the best it can be:
- Who will benefit from this content?
- How do I help them?
- What makes this content special?
Use your answer to those three questions to craft a headline that will demand viewer attention and channel readers to your content.
But don’t get too excited – The first headline you come up with will probably suck. Or maybe it will just be mediocre.
The whole point of AB testing is that you don’t have to come up with THE perfect headline. You simply need to come up with a variety of solid options, and then you can see what performs best.
This is why I recommend creating a list of 5-10 possible headlines.
Next, pick your two favorites and move on to step #2.
2. Send both versions to a live audience.
Now it’s time to test the headlines. You want to show one headline to 50% of your traffic and the other headline to the other 50%.
How you accomplish this will depend on how you acquire traffic.
For example, if you primarily drive traffic to your new blog posts via an email list, create your email and then send half of your subscribers the email using one headline and the other half the same email but using the alternate headline.
If your promote via social media, try posting at different times or across different channels using the alternate headlines and see what happens.
If you promote via paid channels, simply create two ads, using a different headline for each, and set up a normal AB test using proper statistical analysis.
Once you’ve run your tests, it’s time to review the data.
3. Analyze the results.
Which headline performed the best?
If your traffic is too low to get statistically significant results, it’s still worth running the tests. Your initial readers typically come from your email list or your most active social followers – aka the people most likely to share your content. Getting a feel for what they respond to is always worthwhile, and you might notice certain trends over time.
4. Implement the one with the most clicks.
Once you have your winner, simply set it as your permanent headline. That’s all there is to it.
But your headline isn’t the only thing that gets people to click.
2. Split Test Your Featured images
Content Marketing Institute, the industry leader in content marketing, found that “ad engagement increased by 65% when a new image was tested versus simply testing new copy.”
Brian Massey summarizes it well here, “Spend as much time on your images as your copy.”
Whether you’re using paid ads in your content marketing strategy or not, the image matters almost as much as the headline (maybe more).
So, how does one select the right featured image?
There is some science behind choosing a featured image. If you think about it, picking one image is harder than picking several. So, pick a couple and let your test results decide for you.
Here are three keys that will help guide your selection.
1. Pick something compelling
Your image should relate to whatever your article is about. That said, being relevant is pretty ambiguous.
This article from Inc is not directly relevant to the content, but our brains are designed to make connections.

As long as you can relate it in some way, you’re probably OK, but you want your image to be compelling. Not any relevant image will do. Roy H. Williams, director of the business school The Wizard Academy, outlines a number of techniques that make images compelling.
- Silhouettes: We tend to fill in silhouettes with ourselves or our aspirational dreams.
- Portals: Our attention is drawn into doorways, tunnels, windows and openings.
- Cropped Images: When we are only given a piece of the image, we fill in the missing parts.
- Faces: We stare at the human face. This can work against our headlines.
Pro tip: If you use a human face, have them looking at your headline for best resuts.
The above image may not be highly relevant, but it’s use of a silhouette is compelling.
2. Make sure it is relevant to the post
Your headline and featured image should work together to be both relevant and compelling.
Let’s look at some other examples from Inc.

Do you see how they combine relevant images with compelling headlines? It makes it hard not to click on the article.
Finally, the third important factor to consider when choosing an image is…
3. Always use high-quality images
I know you already know this, but I wanted to remind you. Nothing grinds my gears more than a blog post with a terrible, grainy image.
Once you’ve chosen your images, go ahead and start splitting your traffic.
Now you know how to optimize individual posts for conversions, but what about a more general approach to your overall content marketing strategy?
The next element you should be testing is content length.
3. Find Your Ideal Content Length
Now we’re getting into the overall content creation process. Testing your ideal content length will give you an idea to help you create a content template for all your articles going forward.
According to a study done by Medium, the current ideal content length is about 1,600 words; or, around a 7-minute read.
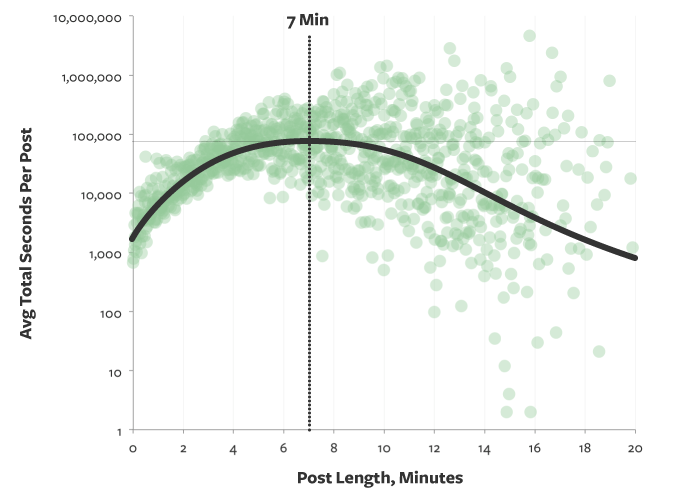
However, this may not be the case for you.
Yes, the average posts that get the most shares are long, in-depth posts. But that doesn’t mean shorter posts don’t get shares as well. And more importantly, that doesn’t mean shorter posts won’t do a better job of driving qualified leads to your business.
The only way to know the optimum length of posts for your audience is to test it. In order to test the ideal length, you can take two different approaches.
The first and simplest option is to try a variety of content lengths over time and look for trends. You could publish a 1,500 word post one week, a 400 post the next week, a 4,000 word guide the following week, and an infographic the 4th week. Rinse and repeat. You should be testing out different content types anyway, and incorporating varying lengths of content within that schedule won’t require much more effort on your part.
The data you want to measure — time on page — is found easily in Google Analytics. This is a free analytics tool that any content marketer should become familiar with.
The second option is to split test a single post by sending segments of users to different length versions of the same post.
In similar fashion, test video length for views and watch times to see how long your videos should be.
4. Take Your Opt-in Forms Seriously
Opt-in or signup forms are a critical part of content marketing and sales funnels. It’s important that they are converting at the highest rate possible.
So what parts of your opt-in form can you test?
First, test the form length.
I’ve seen forms that ask for the whole shebang; everything from your full name to your phone number and more.
Believe it or not, this can work. Just take HubSpot for example. They have a ridiculous amount of free downloads, from templates to eBooks, and every one of them comes with a form like this:

HubSpot Form.
I put three pages into one image because it was too big to fit in one screenshot!
Here’s the kicker: They see tremendous success with this behemoth of a form. I’ve personally filled out at least a half dozen of their forms like this for free downloads.
So, what’s the ideal form length?
Well, take a look at this chart by eloqua.
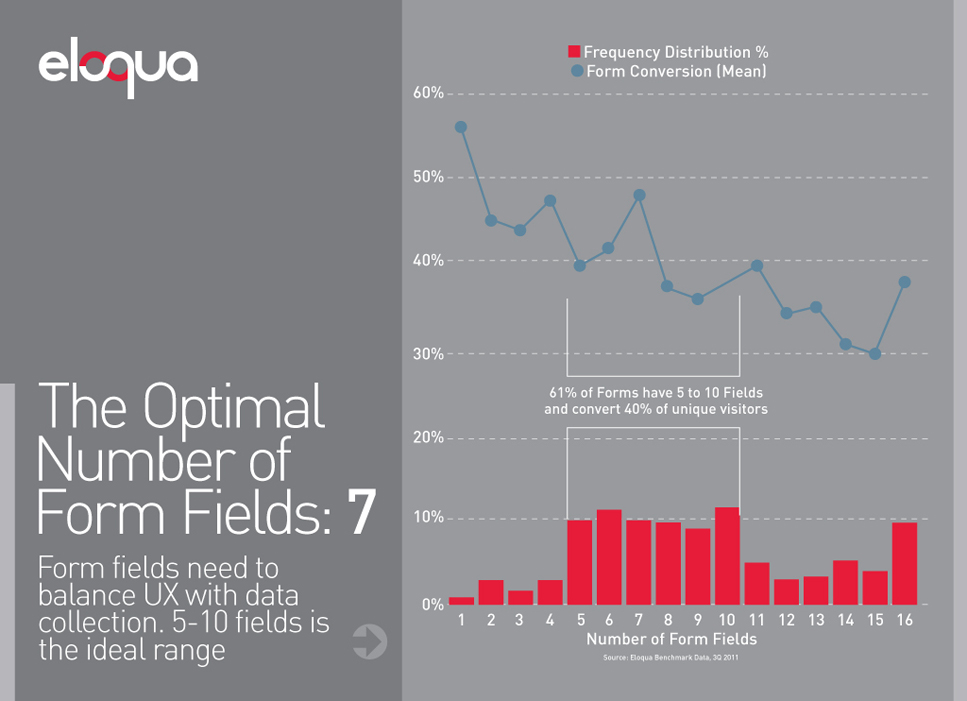
It seems the optimal number of fields is 7 because you’re getting the most information with the least drop off in conversions.
That said, you can potentially get close to a 60% conversion rate when asking for only a single piece of information.
Oddly enough, the data above suggest that having 7 form fields is better than having only 2. While this is just one study, it could mean that you’ve been asking for too little information and might want to revisit your opt-in forms.
Again, it’s all about testing.
- In general, the more form fields you have, the lower your conversion rate will be, but the quality of your list will be.
Once you’ve determined the optimal number of form fields, it’s time to test location. Test placement on the page.
Typically, forms are located:
- Place it at the top to clearly indicate that they must complete a form.
- Place it at the bottom so that they can take action after consuming your content.
- Place it in the sidebar, which is where readers look when they want to subscribe.
- Place it in the content so scanners see it.
- In a popup triggered by exit intent

Where you place your offers is as important as the length of your forms.
Try multiple locations. Personally, I like to include one in the sidebar, one on exit intent, and one either in the middle of or at the end of my content.
Don’t overwhelm your visitors with too many choices. If you have four different opt-ins, some call-to-actions, related posts, and other things to click on, they may just leave your page altogether.
5. Split Test Your CTAs
Whenever you create a piece of content on your website, be it a blog post, a landing page, or even an about page, you should always ask yourself this question:
Where do we want our readers to do after reading this content?
In other words, “Where are we sending them next?”
A lot of people have no idea how to answer that question. I mean, it’s not obvious – especially when you have a lot of content you could send them to.
You might have any one (or more) of these CTAs in your content:
- A lead magnet
- Related blog posts
- A “start here” page
- A sales pitch/landing page
- An initial consultation call
- A content upgrade
- An email subscription
How do you know where to send them?
The answer: Send them to the next stage in your funnel
Depending on your marketing strategy, this might mean immediately collecting a lead, or it could be something else.
Let me give you an example. ChannelApe provides integrations between the systems ecommerce websites use to run their business. ChannelApe offers a free trial for their automatic supplier integration as the next step for anyone reading their list of dropshippers.
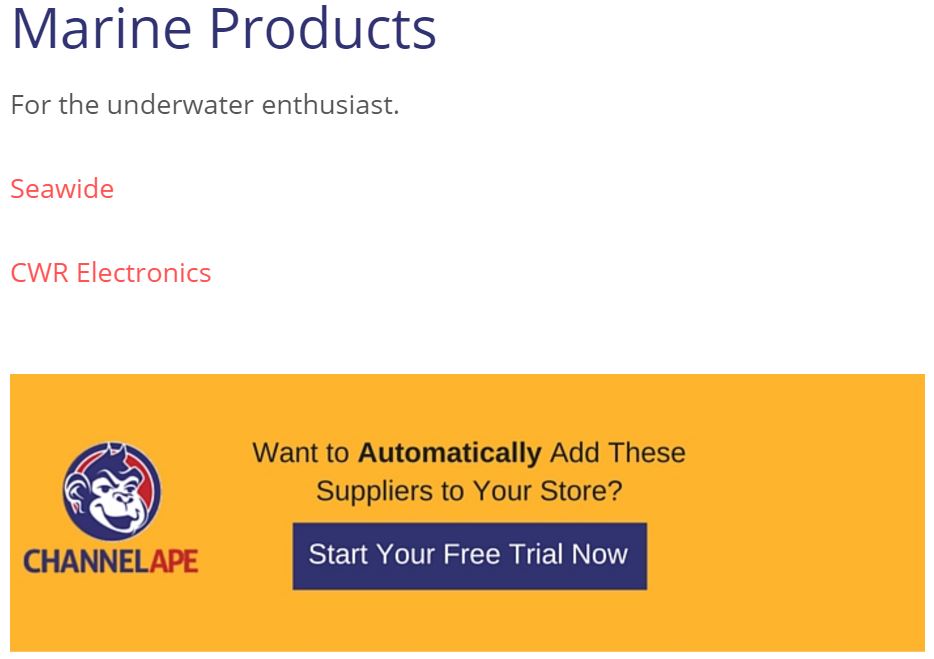
This makes sense because anyone interested in a list of dropshippers is probably also interested in integrating those dropshipper’s products with their store.
Notice how ChannelApe uses a bright orange background to help their CTA stand out from the rest of their content. Color is only one of the variables you should test on your CTAs.
In addition to CTA colors, you can also test:
- Copy
- Images
- Offers
- Positions
OK, let’s say you want to test the position of your related posts.
I know what you’re thinking.
“Bill, wouldn’t I just put related posts at the end of a blog post?”
Maybe. But what if your readers aren’t getting to the end? You don’t want them to leave, do you?
For that matter… what’s “related”? Are you tagging your posts and pages properly?
And what about the posts getting the most interaction? Don’t you think your readers would like to see those?
Or do you want to drive traffic to certain pages over others, like a “start here” page or a new blog series?
Do you see where I’m going with this?
The process of CRO, be it in your content marketing campaigns, your landing pages, or anywhere else, involves asking yourself questions about your readers in order to better understand how to help them.
Simply repeat this process of asking questions for every variable you may want to include, then put your answers to the test.
Conclusion: AB Test Your Content
Let’s recap:
- You want your headlines and featured images to be relevant and compelling.
- The “ideal” content length is 1,600 words, but you shouldn’t blindly follow that number.
- The position and length of opt-in forms matters.
- Always know where you want your visitors to go next in order to effectively use CTAs.
If there’s one thing you should take away from this post, it’s this:
The performance of your content is no less important than any other stage in your funnel. Always test the elements of your content by asking yourself relevant questions about your readers.
Have you ever tried to split test elements of your content before? I’d love to hear. Leave a comment below and let me know!
 Bill Widmer is a freelance writer and content marketer. With over two years of experience, Bill can help you get the most out of your content marketing and blog.
- 20 Landing Page Best Practices to Kickstart Your Conversion Lift - February 2, 2017
- 21 Fascinating Persuasion Techniques for Conversion Optimization - January 18, 2017
- 6 Highly Productive Ways To AB Test Content Marketing - October 18, 2016


Trackbacks & Pingbacks
[…] practice, but it’s pretty simple and worth the effort. If you want to learn more about it, Conversion Sciences goes into detail about what content elements to test and how to test […]
[…] more landing pages and see which ones convert best. Conduct A/B split tests on your headlines, featured images and opt-in forms. If you want to succeed at content […]
[…] more landing pages and see which ones convert best. Conduct A/B split tests on your headlines, featured images and opt-in forms. If you want to succeed at content […]
[…] If you have a few good potential headlines but can’t decide, it’s always good practice to split test them (and other areas of your content as well). […]
[…] post 6 Highly Productive Ways To AB Test Content Marketing appeared first on Conversion […]
Comments are closed.